This post includes a Blogger redirect guide with images. You will get Google Blogger blog redirect info to redirect one post to another post URL within the same blog, redirect all blog requests to custom domain URL and redirect single blog post to custom domain post URL.
As like WordPress, Blogger does not support plugins to enhance custom features. Page redirection is a requirement based on the situation.
For different situations you need to apply auto redirection, For example, you publish a new version of a post or page and want to redirect an old post to a new post, switch your blog from Blogger to custom domain, you want to move a specific post from Blogger blog to another site.
Now, Blogger already supports basic URL redirection for the same Blogger blog. And, for other type redirection in Blogger, you required different changes. These all processes are explained in the following sections.
How to redirect Blogger post or page to another URL?
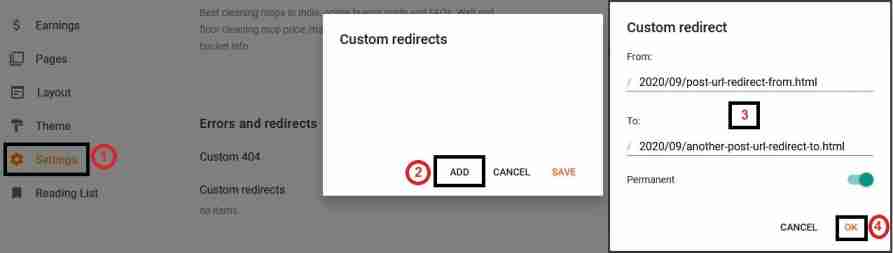
In the Blogger settings page under the “Errors and redirects” section, you will get “Custom redirects” option to manage posts and pages redirection.
Following are steps with an image to redirect Blogger posts or pages to another URL.
- Open Blogger Dashboard: Here, you need to open Blogger.com on your device browser and login with your Google account, which is used for the blog where you want to add redirection.
- Select blog from blogs list: This steps applicable only, if you have multiple blogs in your Blogger account. You will find the blog’s name list in the top left corner, just below the Blogger logo image.
- Open the Settings page and scroll to the “Errors and redirects” section: You can open the “Settings” page for Blogger blog from right sidebar options. In this page, scroll down and go to the “Errors and redirects” section.
- Click “Custom redirects” and add post or page redirect: When you click “Custom redirects” text, popup will shown. Here, you need to click the ”Add” option, which opens a form to set redirection. In this form, you need to set “From” and “To” values. You can check the example value in the process steps image.
- Enable “Permanent” redirect if required: In the redirect setting form, you can set the type of redirection. Default is moved temporarily redirection (302) and you can enabled the “Permanent” option to set permanent redirection (301).
- Click “OK” and “SAVE” to add redirection: After complete redirection form settings, click “OK” and then ”SAVE” option. This option adds redirection for your blog and close form popup.
Blogger Custom redirects FAQs
Now, to managing posts and pages redirects, following are quick FAQs. This info helps to understand, edit and delete existing Blogger redirections.
Where can I find existing Blogger blog post redirect entries?
You can get all added post redirects count in “Settings > Errors and redirects > Custom redirects”. Here, below the “Custom redirects” option, count of redirects show, if any blog redirects exist. And, shows “no items”, if no redirects exist.
How can i edit or delete post redirects in Blogger blog?
You can edit or delete existing post redirects in Blogger from “Custom redirects”. Here, click the redirect count text, which is available below “Custom redirects” title.
Blogger will open all redirects links in detail, when you click redirect count text. From here, click on the redirect entry, which opens the redirect setting form. You can edit or delete that selected entry from this form.
How to redirect Blogger to custom domain?
You can redirect Blogger blog to custom domain by connecting your custom domain to Blogger. To connect to a custom domain, you need to add your domain URL in “Settings > Publishing > Custom domain”. Here, you need to follow instructions given during the process.
For this custom domain connect process, you can check Google Blogger support page.
How to redirect Blogger blog to another domain using Meta refresh?
Meta tag refresh is a secondary option to redirect Blogger blog’s all posts and pages to another domain. In this method, you need to add a meta redirect tag in your Blogger XML template. This meta refresh tag is for HTML head tag.
Following is an example meta refresh entry for Blogger blog redirect to custom domain.
<meta http-equiv="refresh" content="0;URL='https://YOUR_DOMAIN_HERE/'" />In the above example, you need to replace “YOUR_DOMAIN_HERE” text with your domain name. And, the following image shows how this meta tag looks like in the Blogger template.

How to redirect Blogger single post to custom domain post URL?
There is no default Blogger setting option for single page redirection from Blogger to custom domain URL.
But, for solutions, you can apply JavaScript redirect code in your post/page or conditional Meta redirect in template file. You can use this solution, if it is mandatory for you, because automatic redirection of a particular post/page creates a blog’s spam impression on visitors.
JavaScript redirect
To redirect Blogger single post to custom domain post URL, you can add the following JavaScript code snippet in your related post content. This code work anywhere in code, but it is suggested to ad code at end of post content.
<script>
window.location="your_custom_domain_post_url_here";
<script/>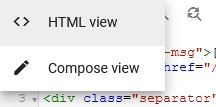
Note: You need to add above given JS code in post content using Blogger HTML editor mode. And, before use code, replace “your_custom_domain_post_url_here” string with your URL value.
Conditional Meta refresh
By conditional Meta refresh you can redirect visitors to another URL when they visit a particular blog url in Blogger blog.
Following is a conditional code example, which you need to add in your Blogger template head tag.
<b:if cond='data:blog.url == "YOUR_BLOGGER_POST_URL_HERE"'>
<meta http-equiv="refresh" content="0;URL='YOUR_NEW_URL_HERE'" />
</b:if>
Note: Before using the above code in your template, replace “YOUR_BLOGGER_POST_URL_HERE” and “YOUR_NEW_URL_HERE” string with your related URLs.
At Last,
Before trying the above steps, it is always suggested to take backup, if you are not confident about changes. Here, you can also take help of friends, who have better knowledge for this change.
Tip: This redirection is automatically when visitors open your Blogger blog. So, it is good practice to add a clear message about redirection in blog, to gives clear idea about redirection to blog visitors.